This page shows basics and details on how to set up and operate a Satisfactory dedicated server.
Summary[]
At the moment, the dedicated server is available for the Windows and Linux operating systems. It can currently be installed using the Steam service (where it is listed in the user's library as a "tool"), or its command line sibling SteamCMD, or Epic Games . Game clients from both the Epic and Steam game stores can connect and play on dedicated servers regardless of where the Dedicated Server was downloaded.
The feedback about the experiences of community members is needed to make dedicated servers available on stable Early Access releases as soon as possible. Please use the Official Q&A site and add the tag Dedicated Server into your post.
Requirements[]
The Dedicated Server is currently provided for Windows and Linux 64-bit architectures using the amd64 platform (i. e. any relatively modern AMD or Intel 64-bit CPU). There are currently no plans for an ARM CPU-compatible build, so the Dedicated Server cannot be deployed to, for instance, a Raspberry Pi or new Microsoft Surface Pro.
The current means of distribution is via Steam (through the normal client or the command-line SteamCMD client). In addition, Coffee Stain is currently working with Epic to get the server software up on the Epic Games Store. Coffee Stain is also working with Valve to resolve issues whereby the Dedicated Server is not showing in the desktop Steam client's Tools section for people who do not own the game client on Steam.
| Processor | Recent (comparable to the i5-3570 [Intel] or Ryzen 5 3600 [AMD] or better) x86/64 (AMD/Intel) processor. No 32 bit or ARM support. The server favours higher single-core performance over multiple cores. |
| Memory | 12GB minimum, 16GB RAM is recommended for larger saves or to host more than 4 players. |
| Storage | 25GB for the game server itself |
| Operating System | Any currently supported version of Windows or major Linux distribution. Out-of-support OSs such as Windows 7 are explicitly not supported. |
| Internet Connection | Broadband internet connection. Hosting from home will require the ability to configure port forwarding. |
Installation[]
Steam[]
You can install the server from your Steam library like you would install any other game. You might have to change your steam library filters to include tools but other than that the process does not differ from any other game.
Coffee Stain is currently working with Valve to make the Dedicated Server visible in the normal Steam client to accounts which do not currently have access to the Satisfactory game client. However, you can still use SteamCMD to download and install the files without needing a Steam account.
If you want to use the Experimental branch of the Dedicated Server rather than the mainline Early Access release, go to the Properties of the entry in your Library, go to the Betas tab, and ensure that the Experimental beta branch is selected. To revert to the mainline release, reverse this process.
SteamCMD[]
If you are installing the server on a headless environment or do not want to use the GUI client for any other reason, you will most likely want to use SteamCMD, regardless of the platform that you are using. SteamCMD itself on both Windows and Linux is thoroughly documented on the SteamCMD wiki page.
Once SteamCMD has been installed, you can use one of the following commands to install (or update) the Dedicated Server in your server's command-line environment (i. e. a Linux terminal, or Windows Command Prompt or PowerShell):
Linux[]
A user without root privileges needs to be used for the installation. Using root might cause issues with permissions and missing libraries.
steamcmd +force_install_dir ~/SatisfactoryDedicatedServer +login anonymous +app_update 1690800 -beta public validate +quit
Windows[]
.\steamcmd.exe +force_install_dir C:\GameServers\SatisfactoryServer +login anonymous +app_update 1690800 -beta public validate +quit
On Windows, SteamCMD uses Steam client DLL files, so it you may get better performance by copying steamcmd.exe into your Steam directory (typically C:\Program Files (x86)\Steam) and then use a command such as this one instead:
"C:\Program Files (x86)\Steam\steamcmd.exe" +force_install_dir "C:\GameServers\SatisfactoryServer" +login anonymous +app_update 1690800 validate +quit
where the first path is the Steam directory and the second is the desired dedicated server install directory. Note: this is not a requirement. if SteamCMD is run with the command stated above (assuming the file path is where you put the executable) and Steam is not installed, SteamCMD will update itself first and download the .dll files that it requires. This is useful if you do not want to install the entire Steam client on your server.
Experimental branch selection[]
To download the Experimental branch of the Dedicated Server, add -beta experimental to the end of your SteamCMD invocation. It is not yet possible with Epic Games Launcher. See the following example commands for Linux and Windows respectively:
For Linux[]
steamcmd +force_install_dir ~/SatisfactoryDedicatedServer +login anonymous +app_update 1690800 -beta experimental validate +quit
For Windows[]
steamcmd.exe +force_install_dir C:\GameServers\SatisfactoryServer +login anonymous +app_update 1690800 -beta experimental validate +quit
Epic Games[]
You can install Dedicated Server Tool DLC by visiting the Epic Games Store Page and adding Dedicated Server Tool add on to your library. Search your library for "Satisfactory Dedicated Server" and select install.
Docker[]
The server can be ran in a Docker container. There are many such containers available on Docker's public repository. Please direct any questions about using these containers to their respective maintainers.
Starting the server[]
Manual - Steam GUI[]
Simply launch the Dedicated Server from Steam just like any other program. You will be able to find it in the Tools category rather than games. It will open a terminal window in which you can review the logs in real time. Do not be alarmed if the window stops showing information after a while. This usually means the server is up, running, and waiting for connections.
Manual - Command line[]
Windows[]
In either the Command Prompt or PowerShell, navigate to the directory in which you had installed the Dedicated Server, and use the following command, with any other options from the below table that you need:
.\FactoryServer.exe -log -unattended
Epic games[]
Satisfactory Dedicated Server from Epic games requires a few changes to use custom arguments.
- First, start the server once as explained above, it will generate a log file in
\FactoryGame\Saved\Logs
- Open the log file and look for the line starting by LogInit: Command Line:, copy it, you will need it later. Here is an example censored with *********:
- The arguments after -unattended are necessary for your dedicated server to work with Epic games.
LogInit: Build Configuration: Shipping
LogInit: Branch Name: ++FactoryGame+rel-main-0.7.0
LogInit: Command Line:  -log -unattended -AUTH_LOGIN=unused -AUTH_PASSWORD=********* -AUTH_TYPE=exchangecode -epicapp=CrabDedicatedServer -epicenv=Prod -EpicPortal -epicusername==********* -epicuserid=********* -epiclocale=en -epicsandboxid=crab
- In the SatisfactoryServer folder you chose for the install, there is a file named launcher_id. Delete it or edit its content. If you don't, any argument you pass to start your server will be replaced by arguments made by Epic games to create the command line.
- Now you can start your server with custom arguments. You will need to use the arguments shown in your log file.
IMPORTANT! If you want to use custom ports as shown in the Command line options, you must put those arguments BEFORE the -log -unattended part:
.\FactoryServer.exe -ServerQueryPort=15000 -BeaconPort=15001 -Port=15002 -log -unattended
Any arguments to set custom port after -log -unattended will be ignored!
Linux[]
Navigate to the directory in which you installed the Dedicated Server, and use the following command, with any other Options from the below table that you need:
./FactoryServer.sh
NOTE! Starting the server in this manner will not automatically restart the server if it crashes or is terminated for other reasons. The server will also very likely stop running when you close your terminal. It is highly recommended that you set up the server to run as a service. For more information, see: Running as a Service.
Command line options[]
The below table outlines the available options for use when starting the server, either from the command-line or through Steam (via editing the Properties of the Dedicated Server's entry in Tools) in both Windows and Linux:
| Option | Description | Example |
|---|---|---|
-multihome=<ip address>
|
Bind the server process to a specific IP address rather than all available interfaces | -multihome=192.168.1.4
|
-ServerQueryPort=<portnum>
|
Override the Query Port the server uses. This is the port specified in the Server Manager in the client UI to establish a server connection. This can be set freely. The default port is UDP/15777. | -ServerQueryPort=15000
|
-BeaconPort=<portnum>
|
Override the Beacon Port the server uses. As of Update 6, this port can be set freely. The default port is UDP/15000. If this port is already in use, the server will step up to the next port until an available one is found. | -BeaconPort=15001
|
-Port=<portnum>
|
Override the Game Port the server uses. This is the primary port used to communicate game telemetry with the client. The default port is UDP/7777. If it is already in use, the server will step up to the next port until an available one is found. | -Port=15002
|
-log
|
Forces the server to display logs in a window (on Windows) or in the active terminal (on Linux). This option is implicit by default when launching on Linux. | -log
|
-unattended
|
Makes it such that the Dedicated Server will not present any dialogs which might otherwise interrupt the server from running if not attended to. This option is implicit by default when launching on Linux, | -unattended
|
-DisablePacketRouting
|
Startup argument for disabling the packet router (Automatically disabled with multihome) | -DisablePacketRouting
|
NOTE: you can also set some of these options via INI files, as follows:
| Equivalent CLI parameter | INI file | Heading and setting |
|---|---|---|
-Port=<portnum>
|
Engine.ini | [URL]
|
-BeaconPort=<portnum>
|
Engine.ini | [/Script/OnlineSubsystemUtils.OnlineBeaconHost]
|
Third-party automated solutions[]
There are several automated solutions for deploying and managing the Dedicated Server out there, for the sake of brevity we suggest using the search engine of your choice to find a game server manager for the Satisfactory Dedicated Server. There are plenty of free and paid options that are "turnkey" implementations.
Please keep in mind that the Dedicated Server is currently not only experimental but known to be unstable and feature-incomplete. Adding a third-party service will make your installation more complex, and add more variables that can break the server or cause unexpected complications. Please understand these risks - people helping you with the Dedicated Server may not know the details about how to help with a third-party program.
Configuration[]
Initial configuration is made in the game by the first player connecting to a server and it largely boils down to giving the server a name and assigning an administration password. More settings are available through the in-game server manager. The server does not start any game on its own. An administrator will have to create a game through the in-game UI. Player password protection is not enabled by default but a player password can be set through the same UI.
For more information, see Configuration files.
NOTE: Server ini files are located in the steam install directory for the server by default: .\steamapps\common\SatisfactoryDedicatedServer\FactoryGame\Saved\Config and may not be generated until the server is closed gracefully using the console "quit" command for the first time.
Logs and crash dumps[]
The server keeps a running log of all of the messages it prints to the console. The logs are rotated on server start, with the latest (current) log being named FactoryGame.log, the next being FactoryGame_2.log, and the rest following a datetime filename pattern (FactoryGame-backup-DATE-TIME.log). These logs are saved in the server's install directory (in the FactoryGame/Saved/Logs subdirectory). Note that depending on build and branch, not all of these may be present.
The server - if so configured (and it is configured this way by default) - also keeps crash dumps of any crashes it manages to save. Those are kept in the server's install directory (in the FactoryGame/Saved/Crashes subdirectory), and each crash report receives its own folder with a randomly-generated UUID.
The game client follows a similar pattern, but the logs and crash dumps are kept in the user's AppData directory alongside save files.
Port forwarding and firewall settings[]
Before you start, you will need to ensure that the following ports are reachable on your server so you might have to create firewall rules or configure port forwarding in your router, depending on your setup. Port redirection is not supported at the moment so the ports that you open in your router need to match the ones presented here (IE: do not forward port 7777 as port 7778 on your router). Each of these ports is overridable via a parameter, in accordance with the table below. If you want to run multiple instances of the server on one computer you will have to override at least one port.
| Default port (UDP only) |
Port Usage | Description |
|---|---|---|
| 15777 | Query Port | This is the port that you need to enter in the game when you first connect to a dedicated server. This port can be redirected freely. |
| 15000 | Beacon Port | This port is automatically incremented if multiple instances of the server are launched and the default is in use already. As of Update 6, this port can be redirected freely. |
| 7777 | Game Port | This port can be redirected freely using the -Port paramater upon server startup, e. g. "-Port=10000" to change the game port to UDP port 10000. At present, if the default port is in use, the next higher one will be checked until a free port is found, and it will be used.
|
Here is an example configuration file to put into applications.d for a UFW-controlled Linux firewall:
[Satisfactory]
title=Satisfactory
description=An extremely satisfying experience
ports=15777/udp|15000/udp|7777/udp
You can use the following PowerShell command on a Windows host to open the default UDP ports used by the server:
New-NetFirewallRule -DisplayName "Allow Satisfactory default inbound ports" -Direction Inbound -Action Allow -EdgeTraversalPolicy Allow -Protocol UDP -LocalPort 15000,15777,7777
Console commands[]
Here are a list of known commands for dedicated servers, as of v5.0.4 the console tab in the server manager is the only way to execute commands
Note: For Update 8 and above, the FG.xxx commands are no longer supported. Please see below for how to change these settings using configuration files.
| Command | Info |
|---|---|
quit stop exit |
Shuts down the FactoryServer.exe service.
(If the server is setup as a service on Linux, it will restart) |
server.SaveGame saveName |
Creates a save of the current session named saveName.
For a saveName with one or more spaces, use quotation marks around the name. |
FG.AutosaveInterval xxx |
Sets how often the server performs an Autosave, in xxx seconds. (Default is 300) |
FG.NetworkQuality xxx |
Sets the network configuration for the game server.
|
FG.DisableSeasonalEvents x |
Replace x with 1 to disable or 0 to allow the FICSmas event.
Requires server restart. |
Configuration changes made at the server Console (e. g. FG.AutosaveInterval) are stored to disk upon a graceful server shutdown, and do not need to be re-implemented when the server is restarted unless the configuration files are removed or reverted.
Changing configuration (Update 8)[]
Open GameUserSettings.ini in the dedicated server.
Create a heading with the content, if it does not already exist:
[/Script/FactoryGame.FGGameUserSettings]
The following will set the Network Quality to the Ultra setting in the game client, will disable seasonal events, and will set the autosave to be every 15 minutes.
mIntValues=(("FG.NetworkQuality", 3), ("FG.DisableSeasonalEvents", 1))
mFloatValues=(("FG.AutosaveInterval", 900.000000))
Be sure to restart the server after saving these changes.
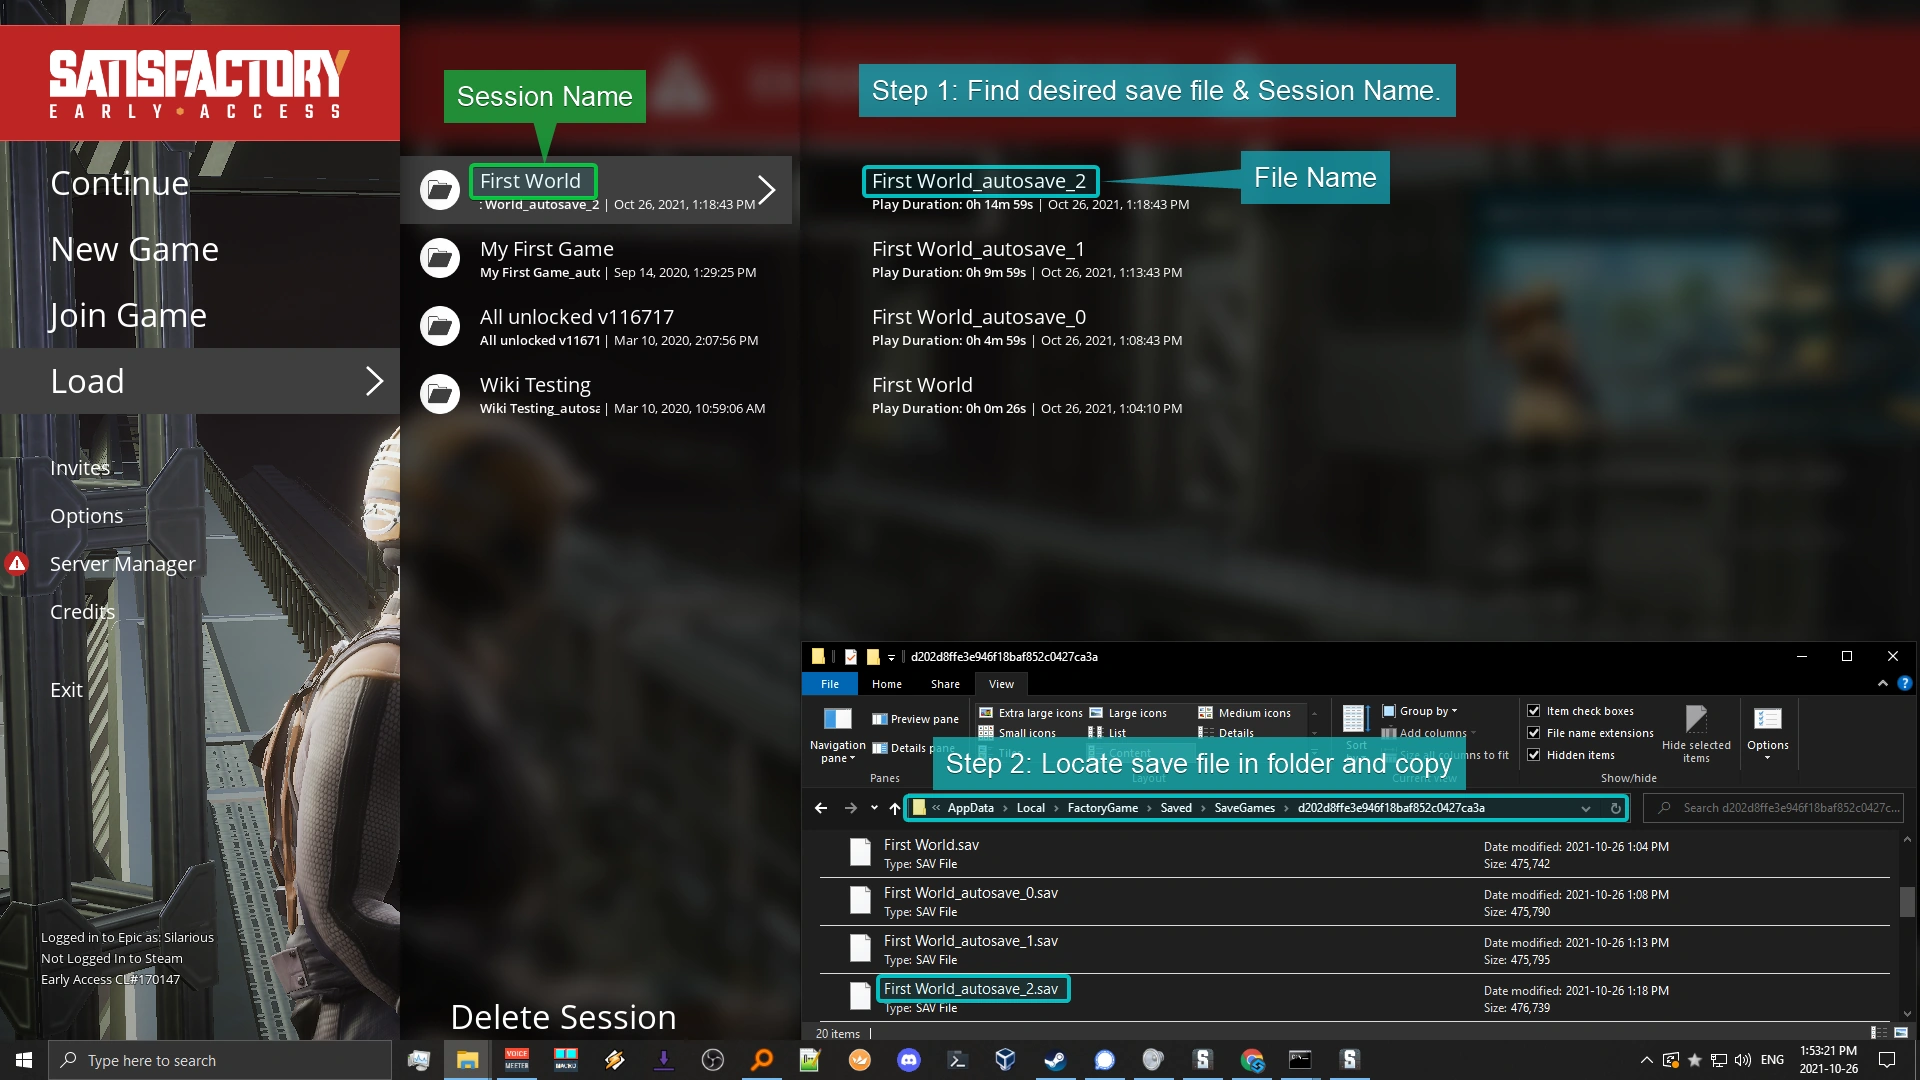
Loading a save file[]
- Find the desired save file and Session name in the Load tab in the main menu.
- Session Name is of critical importance, save files only display it if they haven't been renamed while being saved, the only way to see the Session Name otherwise is from the Load Menu or a save editor
- Locate save file in SaveGames folder and copy the .sav
- Linux:
~/.config/Epic/FactoryGame/Saved/SaveGames
- Windows:
%LOCALAPPDATA%\FactoryGame\Saved\SaveGames
- Linux:
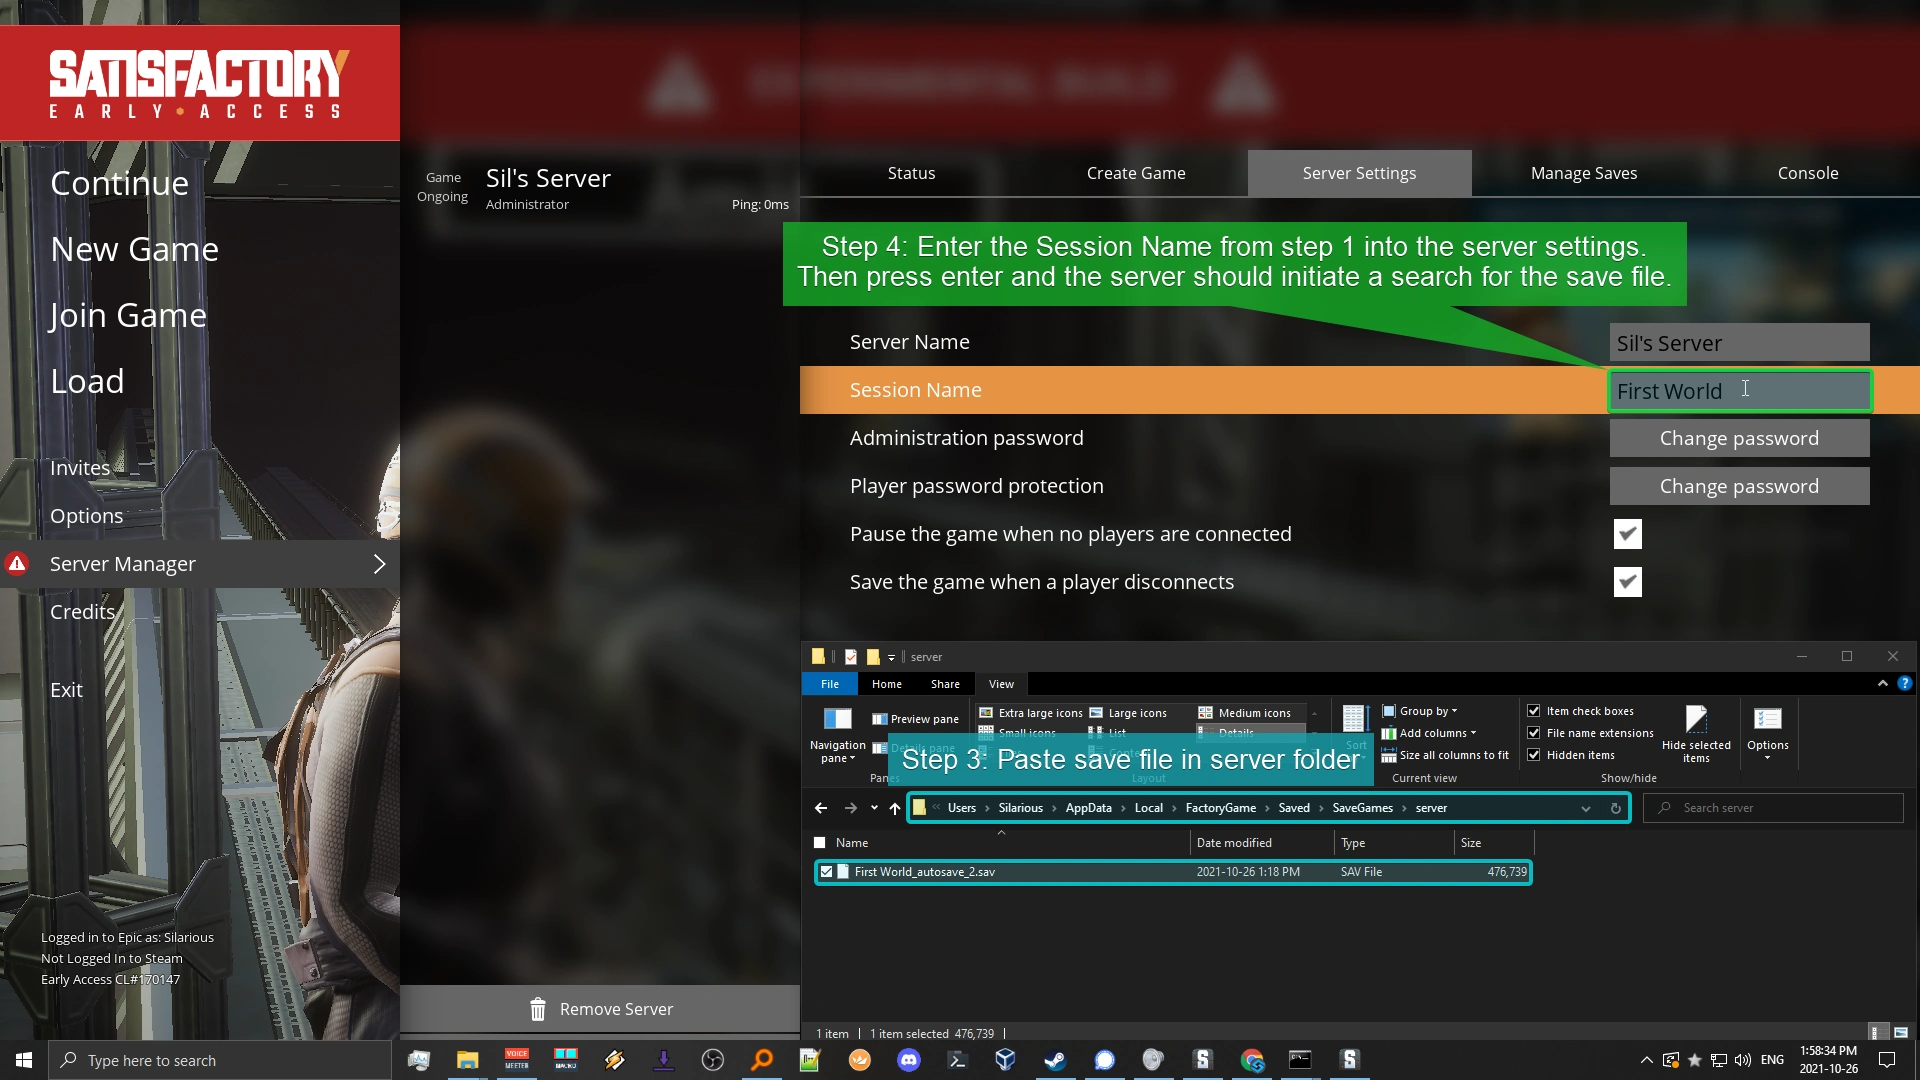
- Paste/Transfer save file to the SaveGames\server folder
- Linux:
~/.config/Epic/FactoryGame/Saved/SaveGames/server
- Windows (local):
%LOCALAPPDATA%\FactoryGame\Saved\SaveGames\server
- Windows (Using NSSM):
%WINDIR%\System32\config\systemprofile\AppData\Local\FactoryGame\Saved\SaveGames\server
- Windows Server (Running as service):
%WINDIR%\ServiceProfiles\NetworkService\AppData\Local\FactoryGame\Saved\SaveGames\server
- Note: The first time accessing the Windows Service paths (NSSM or Windows Server Service), you will need to manually navigate through the folder structure using File Explorer and grant access to the folders as you go (admin rights required). If you do not do this, you will not be able to navigate directly to the save folder.
- Linux:
- Insert the Session Name from step 1 into the server settings tab in Server Manager, press ↵ Enter.
- The server should initiate a search for the save file with the matching Session Name.
- To reiterate, Session Name & Save File Name are not the same, Session Name cannot be changed without a save editor, renaming a .sav file does not change the Session Name.
Other platforms/setups will have differing folder structures, the key point of this tutorial is finding Session Name.
This is a temporary/manual method while the Manage Saves feature is not implemented.
Common errors or problems[]
Update 8[]
Due to the updated game engine the server now runs on IPv6 by default. You can force the server to use IPv4 with the following command line option:
-multihome=0.0.0.0Configuration issues[]
If you believe the server is running but are unable to connect to it, the most common cause is a networking issue. The vast majority of common problems with successfully connecting to the Dedicated Server can be resolved by working through these diagnostic questions:
Is the server actually running?[]
The simplest reason for not being able to connect to the server is that it is not running. Either it was not started, or it has crashed and not been subsequently restarted. A simple way on Linux to check whether the server is running is with the command pgrep -f FactoryServer.sh. If you run that command, you will either get no response (indicating the Dedicated Server is not running) or one or more numbers (indicating that you have one instance of the Dedicated Server running per number you see). Each number given as a response to the command is the PID (Process ID) of that instance of the shell script which started the Dedicated Server.
Windows: Error libcurl error: 60 (Peer certificate cannot be authenticated with given CA certificates[]
If you're seeing this error/warning message in your server logs, just install the Epic Games Launcher. You do not have to log in - just install it, as it will deploy the Epic certificate required to connect to Epic Online Services (EOS)
Is the server listening on the correct ports?[]
If you have inadvertently started the server more than once at any one time, you may not have the server running on the network ports you are expecting it to be. Since you are sure now that the server is indeed running, the next step is to check to see which UDP ports the server is bound to (or "listening" on).
Checking Listening UDP Ports on Windows[]
On Windows, you can get a list of bound UDP ports with the Get-NetUDPEndpoint command. Adding some extra filters to it will restrict the output of that command to only show a list of IP addresses and ports to which an Unreal game server process (such as the Satisfactory Dedicated Server) is listening. Review that output for the expected ports of 7777, 15000, and 15777. The command and its typical output are shown below:
Get-NetUDPEndPoint | Select-Object LocalAddress, LocalPort, @{Name="Process";Expression={(Get-Process -Id $_.OwningProcess).ProcessName}} | Sort-Object -Property LocalPort,Process | Where-Object{$_.Process -like "UnrealServer-Win64-Shipping"}

LocalAddress LocalPort Process
------------ --------- -------
::                7777 UnrealServer-Win64-Shipping
::               15000 UnrealServer-Win64-Shipping
::               15777 UnrealServer-Win64-Shipping
0.0.0.0          15777 UnrealServer-Win64-Shipping
Checking Listening UDP Ports on Linux[]
On Linux, you can get a list of bound UDP ports with the ss command. Filtering the output of that command will restrict the outputof that command to only show a list of IP addresses and ports to which an Unreal game server process (such as the Satisfactory Dedicated Server) is listening. Review that output for the expected ports of 7777, 15000, and 15777. The command and its typical output are shown below:
$ ss -plnu | grep Un
UNCONN    0     0    *:15000      *:*    users:(("UnrealServer-Linux",pid=2353772,fd=21))
UNCONN    0     0    *:15777      *:*    users:(("UnrealServer-Linux",pid=2353772,fd=18))
UNCONN    0     0    *:7777       *:*    users:(("UnrealServer-Linux",pid=2353772,fd=20))
Is the server bound to the correct interface?[]
While checking on the UDP port bindings in the previous step, take a look at the IP address associated with the port in the output from ss or Get-NetUDPEndpoint. If you did not use the -multihome switch when starting the Dedicated Server, the associated address will probably appear as one of *, 0.0.0.0, or ::. Any of these are fine, indicating the server is listening on all interfaces. If you see a specific address, such as 192.168.1.203, this is also fine, but you will have to be aware that only that internal (or LAN) IP address will work for connecting to or forwarding connections to the server. If you have trouble connecting via IPv6, specify -multihome=::, this will enable the server on both IPv4 and IPv6.
Is the server firewall allowing ingress on the correct ports?[]
In short, did you follow the steps in the Port Forwarding and Firewall Settings section above? Verify your host's firewall settings are configured to allow inbound connections on the UDP ports the Dedicated Server is using.
Are the port forwarding settings at the NAT pointing to the correct address and all three correct ports?[]
On your router or other network ingress point, double-check that the Port Forwarding settings are correctly configured to direct traffic on all three of the UDP Ports that the Dedicated Server uses to the LAN IP address of the host running the Dedicated Server. Be sure you are forwarding UDP ports, not TCP ports (If you are forwarding both TCP and UDP ports, that is fine, the important thing is that the UDP ports must be forwarded).
Are you or anyone else able to connect to the server from a client on the LAN?[]
From the same host or another host on the same LAN (i. e. generally in the same building), attempt to connect to the Dedicated Server from the Server Manager in the game client If this works, the the server is clearly running and the firewall on the server is clearly allowing inbound connections.
Are you or anyone else able to connect to the server via the internet?[]
From a host which is not on the same LAN, attempt to connect to the public IP address of the host running the Dedicated Server from the Server Manager in the game client. If this works, then not only is the server clearly running and the server firewall allowing inbound connections, but the port forwarding settings are now confirmed to work as well-- you server is online and accessible! Have fun, and stay effective!
SDL Priority Manager[]
Loading Steam API...Failed to init SDL priority manager: SDL not found

Failed to set thread priority: per-thread setup failed

Failed to set thread priority: per-thread setup failed
This issue can be resolved by downloading the dependency. For example, on a Debian-derived Linux distribution:
sudo apt install libsdl2-2.0-0:i386SteamAPI_Init(): Sys_LoadModule failed to load: /path/to/.steam/sdk64/steamclient.so[]
steamclient.so: cannot open shared object file: No such file or directory
/home/your_user/.steam/sdk64/steamclient.so
/home/your_user/.steam/sdk64/steamclient.so: cannot open shared object file: No such file or directory
[S_API] SteamAPI_Init(): Sys_LoadModule failed to load: /home/your_user/.steam/sdk64/steamclient.so
This issue can be resolved by creating a symbolic or hard link from the expected path to the location where the library actually exists, for example:
ln -s /usr/games/steamcmd/linux64/steamclient.so /home/your_user/.steam/sdk64/Log output should change:
steamclient.so: cannot open shared object file: No such file or directory
[S_API] SteamAPI_Init(): Loaded '/home/your_user/.steam/sdk64/steamclient.so' OK.  (First tried local 'steamclient.so')
SteamCMD error: "state is 0x606 after update job" when installing/updating[]
Error! App '1690800' state is 0x606 after update job.SteamCMD error 0x606 is thrown when SteamCMD attempts to update a file and the operating system says that it cannot write to the file because it is in use by another process. The most common cause for this is attempting to update while the server is already running. If you have already stopped the server and are still getting this error, the issue can be resolved by rebooting the host.
Trains not un/loading[]
This issue can be resolved by loading the save file into the game locally, rebuilding the Train Station, saving and loading the save file back onto the server.
Server running on Virtual Machine, crashing on world creation or save load[]
On the Proxmox hypervisor specifically, check that the CPU type defined for your VM is not KVM64. This processor type will cause the Satisfactory Dedicated Server to crash on load. Instead of the KVM processor type, select host, or another processor type to resolve the crashing. This may also affect other hypervisors depending on your configuration, if you have the processor type KVM set.
FAQ[]
How do I gracefully shut down the Dedicated Server?[]
Regardless of which operating system the server is running, it can be gracefully shut down by connecting to the server in the Server Manager in the game client, and on the Console tab, issuing the quit command. The means to shut the Dedicated Server down without access via a game client depend on the operating system you are running.
On Linux, the server process can be gracefully shut down by sending SIGTERM to the server process or, if you have the server controlled by systemd, with the command systemctl stop satisfactory, where "satisfactory" is the name of your unit file. Note that the service file can specify the KillSignal= attribute in the Service block, but SIGTERM is the default if not set.
On Windows, if you have the server running 'interactively' (which is to say, there is a window showing the server logs in real time), focus on that Window and press Ctrl+C. Do not just close the window; this will kill the server process instantly and not give it the proper time to clean up after itself and write the state files to disk. If you have it running as a service, you can use the Services snap-in to the Management Console, find the service, right-click it and Stop the service there.
How do I update the Dedicated Server?[]
If your server was installed using the desktop Steam client, it should be automatically updated shortly after the update is released. You may need to shut your server instance down and tell Steam to verify the local files, or restart Steam, to force the update to go through.
If your server was installed using the SteamCMD command-line client, you can shut down the server instance and then use the same command you used to install the server to check for and install an update.
How do I reset the Administrator password?[]
In the location where you can find the server's saved-game files, look for a file called ServerSettings.port, where port is the server port number (e. g. ServerSettings.15777) and delete it. This will delete all server settings relating to passwords, server name, and session name, and you will be asked for a new Administrator password when connecting as when the server was first set up.
How can I have more than four players in my server?[]
First and foremost, before implementing the answer provided here, note that the server is being tuned to be performant with the expected player cap of four. Increasing this limit may have ramifications with respect to server stability, performance, and resource usage.
That said, if you will wish to proceed with increasing the player limit, find the Game.ini file in your server's configuration directory (see above), and add this stanza to the top of the file (replacing the default of 4 with the desired player cap for your server):
[/Script/Engine.GameSession]
MaxPlayers=4
I thought the Dedicated Server was multi-threaded- why am I only seeing one core being used?[]
While the software is in point of fact multi-threaded, the fact remains that the game's design is still predominantly reliant upon a single primary thread. As one of the developers recently put it:
We never intended to say the server will evenly use all your cores. We meant more that the server spawns up to 26 threads (per work set). The game loop is still fundamentally single threaded though and all multi threaded work is happening on ticks. So one core will always work harder than others as a result.
I was running an Experimental server after the U5 release, but I want to move it to Early Access, and it's not converting. What do I do?[]
Sometimes, Steam can helpfully remember which branch you have selected. If you were using -beta experimental to stay pinned on the Experimental branch, removing it from your update command may not roll you into Early Access. To force this to happen, use -beta public to force the switch.
How can I get my friends to join my server?[]
In order for your friends to join your server, you will need to give them your Public IP Address (WAN IP) and the port if it differs from 15777. You can obtain this by searching for "what is my ip" in most search engines.
Please note however that this will require you setup port forwarding correctly and have the correct firewall entries in place to allow connections into the network where the server is hosted.
I was running a Dedicated Server on Experimental; now that Update 5 is on Early Access, how do I switch?[]
While U5 was only on the Experimental branch, that was the only version of the Dedicated Server that was available. With the release into Early Access, the default branch of the Dedicated Server was updated to also be on the Early Access branch. All you need to do is let the server update and it will roll into Early Access; if you want to stay on or revert the Dedicated Server into the Experimental branch, you have to alter your configuration as described above.
The Dedicated Server stops after throwing two warnings; what do I do?[]
There are two common warnings that you will see once the server has finished its startup process. These are warnings, not errors, and in this case they can be ignored. If you see the two messages below there is nothing wrong, and the server is now just waiting for a client connection. Both messages related to the Epic Online Store (EOS), which the server has no interactions with, and so these warnings are completely innocuous.
LogOnline: Warning: OSS: EOSSDL-LogEOSP2P: NAT Detection Failed, unable to resolve host
LogOnline: Warning: OSS: EOSSDK-LogEOSAnalytics: EOS STA Analytics disabled for route
History[]
Dedicated server patches are being released in par with every game patch. This section only lists changes directly related to the dedicated server itself, changes to multiplayer in general are tracked here.
- Patch 0.5.1.6:
- Improved stability of the packet router
- Improved CPU usage of the packet router
- Added a startup argument for disabling the packet router:
-DisablePacketRouting
- Patch 0.5.1.2:
- Implemented a mechanism that routes all server packets through the query beacon, in effect reducing the number of ports that need to be open/forwarded to 1, simplifying setup.
- Patch 0.5.1.1:
- Fixed a bug that made Clients spam poll the server, now we should poll much less
- Fixed some more issues with the Crash reporter integration
- Patch 0.5.0.14:
- Found an issue where threading was forced to be disabled for dedicated servers in some scenarios. Fixed it so now we should actually make use of multiple CPU cores
- Added tick rate information on the Server Status UI Menu
- Production Lights for all buildings should now be working again
- Patch 0.5.0.13: Added Crash Reporter integration for Dedicated Server for both Windows and Linux, which is enabled by default and can be disabled using a config edit
- Patch 0.5.0.12: Enabled background and hi-prio task sets for servers to match what they are for the game, This should further improve multicore CPU usage
- Patch 0.5.0.11: Servers should now use all available cores (Up to 26 worker threads) on both Windows and Linux
- Patch 0.5.0.9:
- Implemented a first revision of the Save Manager in the “Manage Saves” tab under Server Manager
- Increased the beacon connection timeout to 30 seconds (Previous value was 5 seconds)
- Patch 0.5.0.8:
- Fixed spelling mistake in the server is offline message
- Server state is now polled a lot less by the clients (at most 3 times per second) and clients back off gradually if a server does not respond to pings which makes the client behaviour less consistent with DDOS attacks
- Clients do not store DNS lookup results in the server manager file and instead the DNS lookups are made every time the client starts up which makes the clients work better for servers with Dynamic DNS
- Patch 0.5.0.7:
- Fixed a crash on startup on Dual Stack Linux, IPv6 should now work on more recent kernels
- Fixed a shutdown crash caused by OnlineSubsystemEOS
- Patch 0.5.0.6:
- Added IPv6 Support
- Made FGAbstractServerWidget public for modders
- UI should now properly display when new connections are established
- Potentially fixed a crash related to using the Rebar Gun on Dedicated Server
- Fixed Nobelisk/Snowballs on Dedicated servers
- Patch 0.5.0.4:
- Changed "-GamePort" server parameter to "-Port"
- Added a “Save Game” server command (
server.SaveGame <saveName>) - Flipped around the Show/Hide Address Toggle Button text in the Add Server popup
- Patch 0.5.0.0: Introduced
Trivia[]
- The console of the server (as of Patch 0.5.0.12) serializes boolean values with typos: "IsAwake newState = flase", "IsAwake newState = ture". This is considered a common typo.
- When Patch 0.5.0.0 was released, Dedicated Servers were initially only available to those using Steam. On December 7, 2021, it was announced on Twitch Stream by Community Manager Snutt Treptow that Dedicated Servers were available on Epic Games.
| |||||||||||||||||||||||||||||