| This article is outdated. You can help Satisfactory Wiki by updating it. |
This tutorial explains what there is to know about trains, how to set them up, how to calculate throughput etc.
NOTE: This article is still work-in-progress, images are to be added.
Prerequisites
Trains are unlocked in Tier 6. Before they can be unlocked, Oil processing has to be set up to allow for ![]() Computers to be made - although Computers found at Crash Sites can allow a few early station setups. Beside Computers, a sufficient amount of
Computers to be made - although Computers found at Crash Sites can allow a few early station setups. Beside Computers, a sufficient amount of ![]() Heavy Modular Frames and
Heavy Modular Frames and ![]() Motors are also required.
Motors are also required.
The basics
Track construction
![]() Railways are built using
Railways are built using ![]() Steel Beams and
Steel Beams and ![]() Pipes. One railway segment can be up to 100 meters long.
Railways take shape and angle based on the terrain they are built on, which can lead to very wiggly tracks or tracks that clip through the ground on uneven terrain. For optimal results, construct Railways on Foundations.
Pipes. One railway segment can be up to 100 meters long.
Railways take shape and angle based on the terrain they are built on, which can lead to very wiggly tracks or tracks that clip through the ground on uneven terrain. For optimal results, construct Railways on Foundations.
Switches
Switches are formed by joining Railway segments together:
- This cannot be done directly before or after a Train Station
- Railroad Switch Control will appear at each switch; it is only relevant for manual driving (automatic trains will always choose a path regardless of the switch control)
- A switch doesn't have to be just 2-way, it is possible to keep on adding more tracks
- A switch can be cross-shaped
- Avoid: There is a bug, where if a single Railway segment has a switch on both ends, automatic trains will have trouble pathing through the switch. Instead of having one Railway segment with a switch on both ends, break the segment into two smaller segments, both of which only have a switch at one end.
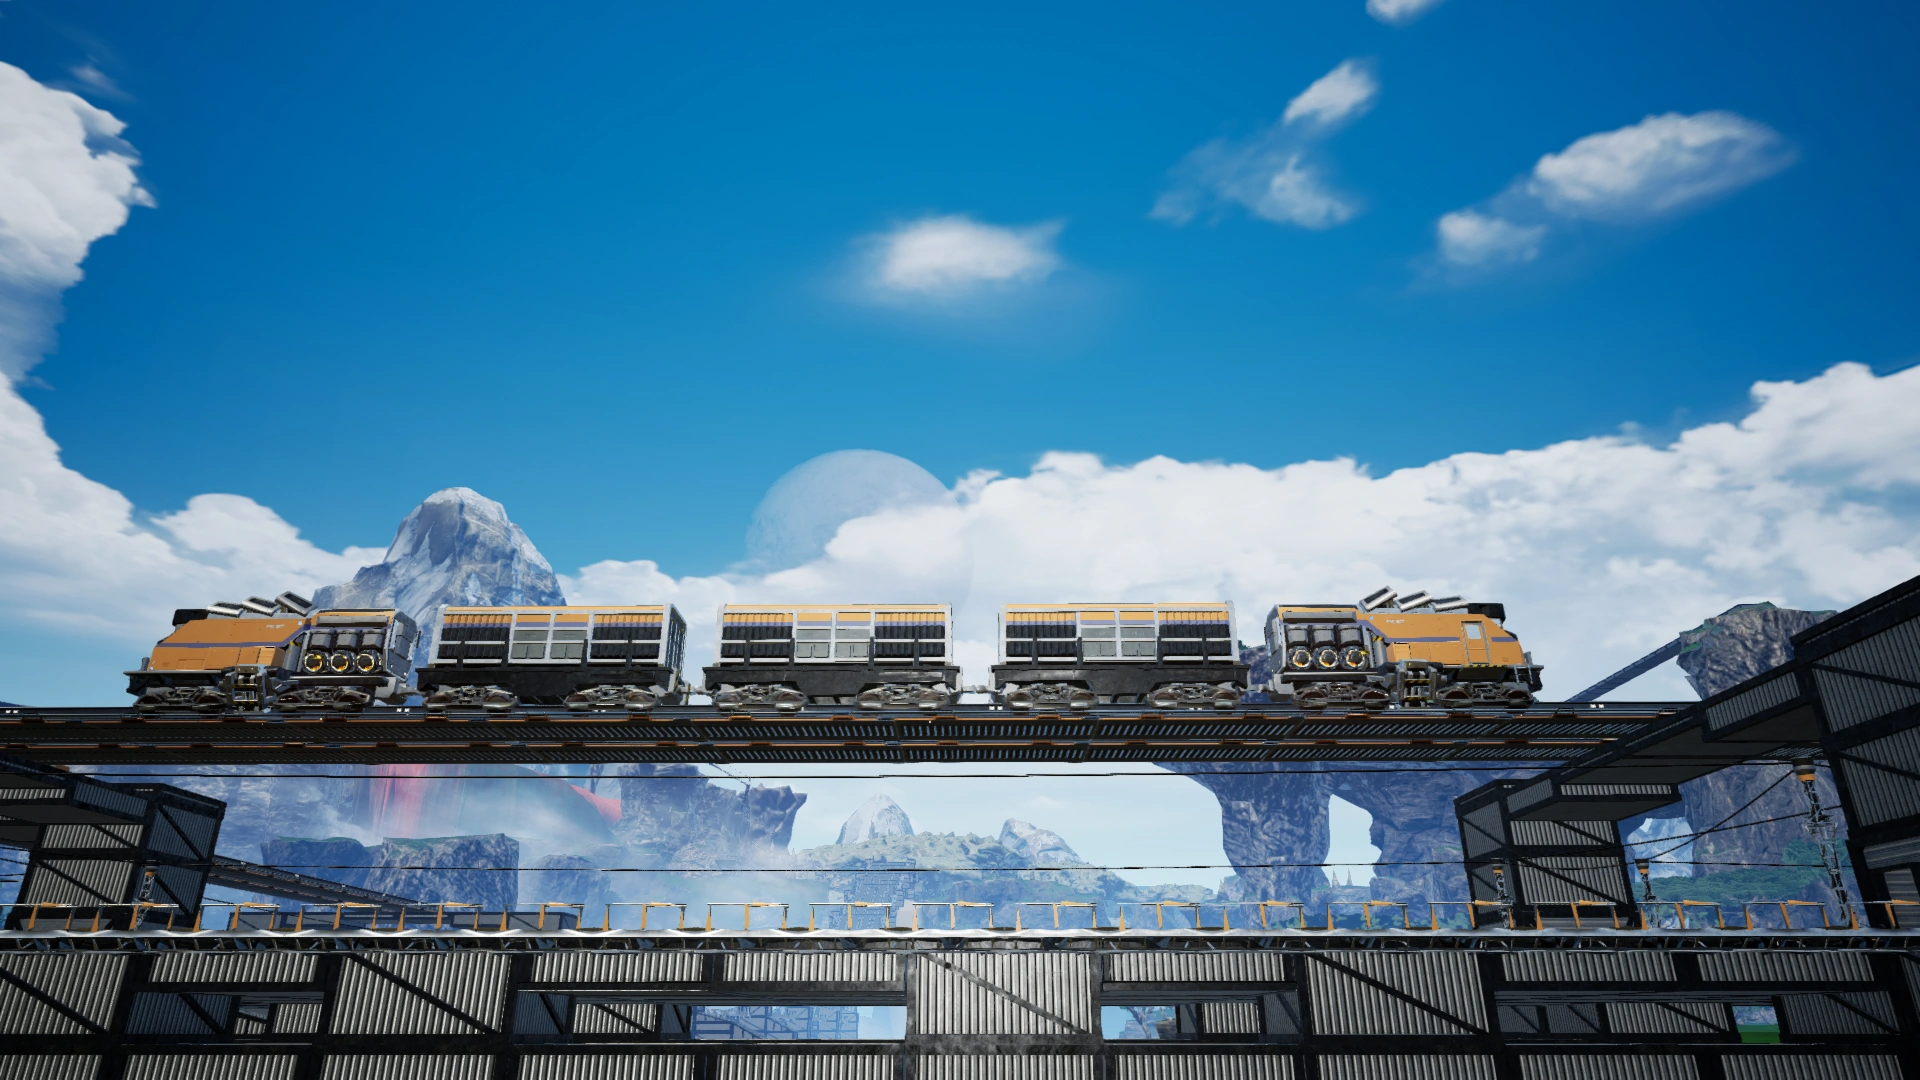
Train composition
Trains are made up out of ![]() Electric Locomotives and
Electric Locomotives and ![]() Freight Cars. Trains with more carriages will speed up and brake more slowly, but most importantly, they will handle inclines worse. Therefore, having multiple Locomotives is a requirement unless the track is completely without inclines. The recommended ratio is one Locomotive for four Freight Cars. Whether a Freight Car is loaded does not affect the weight.
Freight Cars. Trains with more carriages will speed up and brake more slowly, but most importantly, they will handle inclines worse. Therefore, having multiple Locomotives is a requirement unless the track is completely without inclines. The recommended ratio is one Locomotive for four Freight Cars. Whether a Freight Car is loaded does not affect the weight.
Freight Cars can carry either 32 stacks of items or 2,400 m3, however, not fluids and items at the same time.
It is un-advisable to mix cargo in Freight Cars; the optimal solution is to have at least one Freight Car per item. See § Calculating throughput for how many Freight Cars should a train have to have sufficient capacity.
Train operation
A train can be only operated if it has at least one Electric Locomotive and is on a powered Railway. For manual driving, W/S to speed up or use engine brake (based on direction),A /D to change upcoming signal direction, Space to use air brake and ![]() to use the horn. Automated driving is set up using a timetable (explained in § Automation).
to use the horn. Automated driving is set up using a timetable (explained in § Automation).
Trains derail when colliding with other trains if there is sufficient speed involved. If it is a low speed collision, sparks will appear at the point of contact. Trains can collide if they are on the same track with improper signaling or if two tracks are too close. As mentioned before, there are signals and they are important to control the flow of automated trains.
Bi-directional trains
Placing a Locomotive (or Locomotives) on both ends of a train makes it bi-directional, as Locomotives on autopilot don't reverse. A bi-directional train can run as a shuttle without turning around.

A bi-directional train
Stations and loading cargo
Stations consist of four different buildings: ![]() Train Station,
Train Station, ![]() Freight Platforms,
Freight Platforms, ![]() Fluid Freight Platforms and
Fluid Freight Platforms and ![]() Empty Platforms.
Empty Platforms.
Starting with the Train Station, it is very important to note that it is directional. The direction of the Train Station dictates how will trains arrive in the station, but not depart. That means that for bi-directional trains, both Train Stations have to face the end of the track. Train Stations have to be powered and constantly consume 50 MW, they also power the railway network they are on and all other stations on the same network (making it an extension of the standard power grid).
Freight Platforms attach to the Train Station. They can be rotated either left or right, which does not affect how they behave. Inside their UI, they can be either set to "load" or "unload" (where the yellow button is the currently active option). One Freight Platform handles one Freight Car, therefore to load a train consisting of one Locomotive and three Freight Cars, the station will begin with a Train Station (for the Locomotive) followed by three Freight Platforms. Freight Platforms stop accepting or outputting items during the 25-second long loading animation. To keep items moving, Industrial Storage Containers or at least two Industrial Fluid Buffers should be placed before each loading and after each unloading Freight Platform.
Freight Platforms can be spaced out using Empty Platforms. For example, for a train made up of two Locomotives and seven Freight Cars where only the 3rd Freight Car has to be loaded, the station will consist of a Train Station, three Empty Platforms (one for the second Locomotive and two for the two Freight Cars that precede the 3rd one) and one Freight Platform (that handles the 3rd Freight Car). It is not necessary to add trailing Empty Platforms after the last used Freight Platform.
Path Finding
Auto Pilot trains will calculate their paths based on tiles (real or implied) between the current set of destinations in their time table. They will always choose the shortest path between two destinations. This cannot be controlled by train signals. Trains will also ignore any other trains on the same path during calculations which can result in either collisions or delays. On single track bi directional paths this could also result in head to head deadlock. Trains will not use "bypass" lanes to avoid each other (unless the signalling forces them to). Just shortest path.
That said, you can do things to prevent issues. For instance, having train stations branch off the mainline and properly signaled, trains will be out of the way of other trains on the mainline. Use of dual one way tracks also removes many of the issues of single bi directional tracks.
Lastly, train stations add a 2000 tile "penalty" to the path. If you build stations inline in the mainline keep this penalty in mind, especially if you notice the trains taking odd paths to avoid stations.
Signals
Main article: Train Signals
![]() Train Signals are structures, that allow the construction of more complex rail networks, controlling the movement of trains, and allowing multiple trains to use the same network without the risk of colliding. Train Signals come in two flavors, Block Signals and Path Signals.
Train Signals are structures, that allow the construction of more complex rail networks, controlling the movement of trains, and allowing multiple trains to use the same network without the risk of colliding. Train Signals come in two flavors, Block Signals and Path Signals.
A signal can only be constructed at the joints or ends of Railway tracks with each signal having a forward direction, that is determined by the side the signal is on. Automated trains will not pass a signal that is "backwards" from their direction but placing two signals in opposite directions makes the track bi-directional.
Blocks
By adding signals the Railway track is divided into blocks. Each block must have at least one entry and one exit signal, but more complex structures with multiple entries and exits can be constructed. The entry signals for a block must be of the same type (either all Block or all Path), otherwise the signals will display an error and any automated train will refuse to enter. Note that separate tracks that come too close to one another or clip are considered part of the same block, allowing for the safe construction of crossing tracks.
If any part of a train, even only half a cart, is inside a block this block is considered occupied. Blocks without trains are considered empty or vacant.
Block Signals
Block Signals are simple signals either permitting an automated train to move into the next block or stopping it at a red light. A Block Signal will show red if it leads into an occupied block and green if the next block is empty, this prevents trains from colliding by ensuring that every block will have at most one train in it.
A Block Signal is only concerned with the block it leads into. Block Signals therefore do not communicate with other Block Signals further ahead making it impossible to "chain" signals or to ensure the next block in a train's path is empty. Automated Trains however can look beyond the current signal and will slow down if they would enter an occupied block.
Path Signals
Path Signals subdivide a block into multiple paths than can be occupied individually allowing for multiple trains to move through a block simultaneously.
An approaching train will reserve a path through the block, preventing other trains that would cross its path from entering but allowing those trains to enter that use another path. This is especially useful for intersections with multiple entries and exits as a train does not have to wait for another train to leave the intersection, like a Block Signal would require, but instead the train can enter the block as long as it's safe to do so.
Path Signals also look ahead of the current block ensuring that a train that enters the block can also exit it. This prevents a train from stopping inside an intersection and blocking it. This seems to extend for as long as there are Path Signals leading to situations were a train refuses to enter a block because a different block further down the line has an occupied path.
Using Signals
Here are a few examples of how to use signals. Keep in mind, that signals are not strictly necessary if there is only a single train on the entire network.
Double Track Railway
By using the directionality of signals, two railway tracks can be build side-by-side with one only allowing traffic in one direction and the other in the opposite direction. This allows trains to always safely pass and can increase throughput when there is a lot of traffic in both directions.
It's best to decide on a "handedness" (left- or right-hand traffic) for the rail network to make planning easier and prevent accidental head on collisions.
Passing Lanes on Bi-Directional Tracks
A single track can also be used in both directions by multiple trains through the use of passing lanes. These are splits in the track creating one side for each direction and allowing two trains to pass on another.
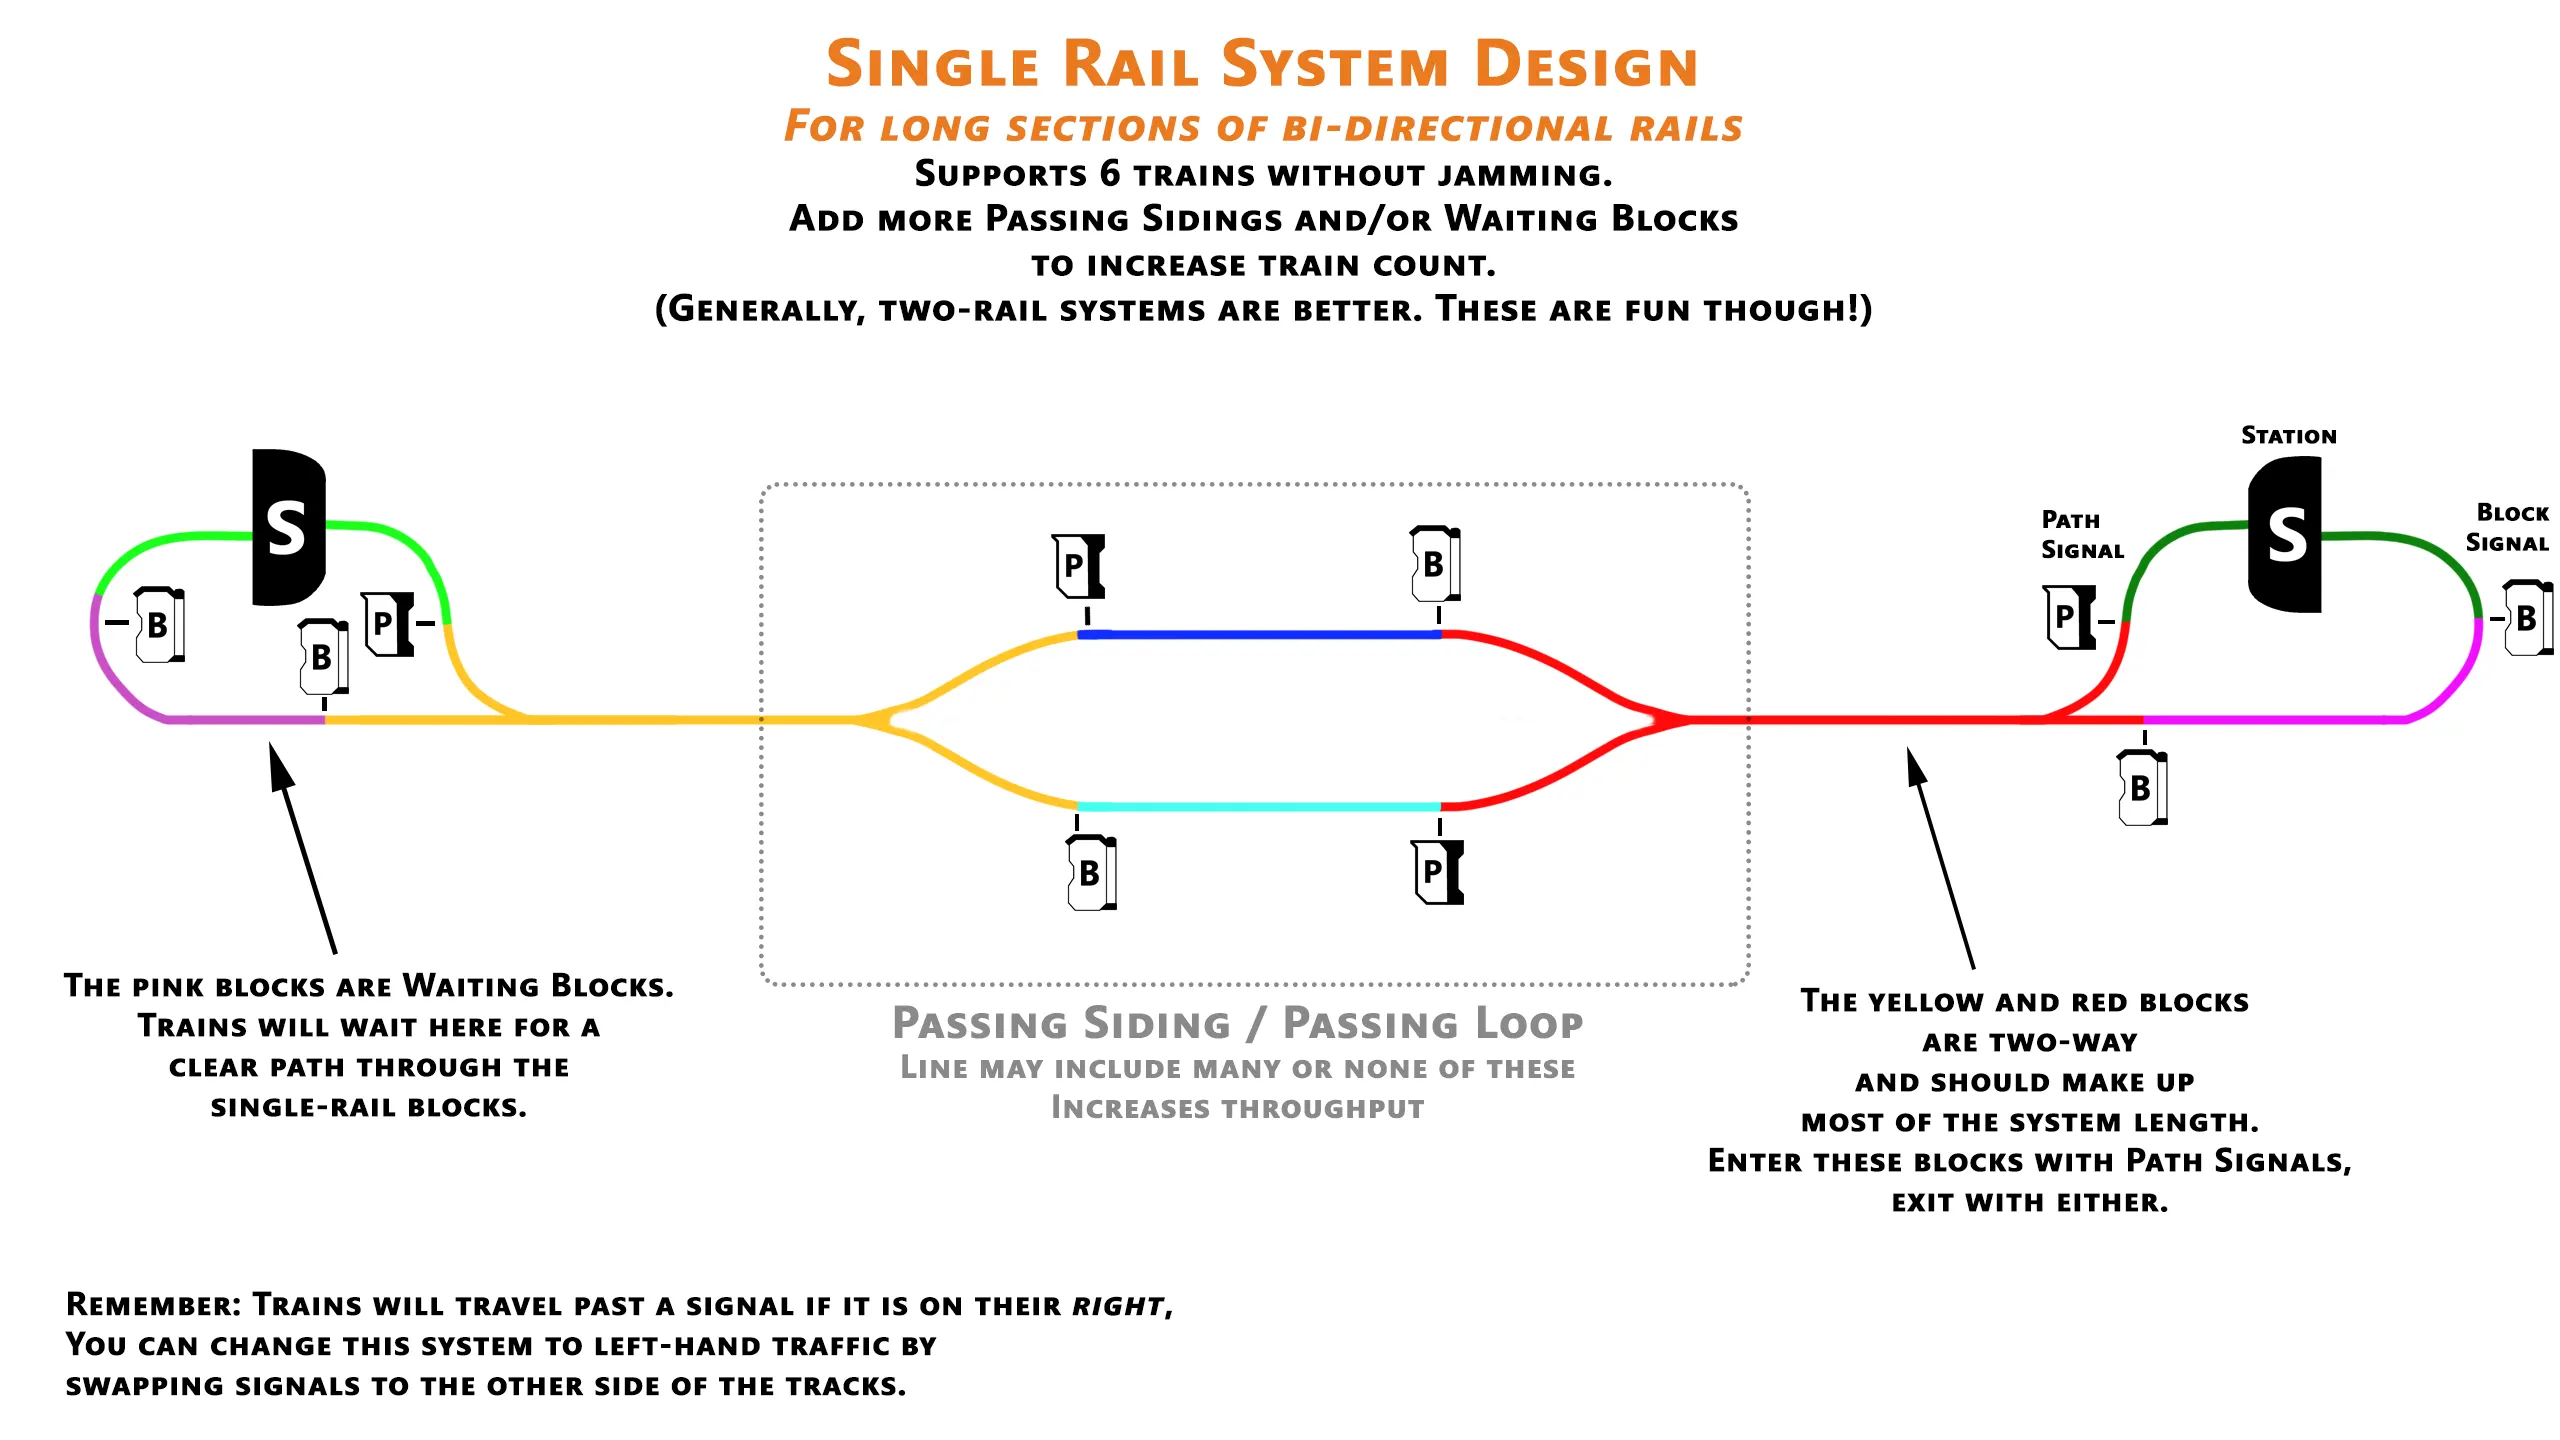
Subdividing linear tracks
On long stretches between intersections or stations the track can be further subdivided through Block Signals to allow multiple trains to move on the track at the same time. This is especially useful when using Path Signals at intersections as trains will not enter the intersection if they cannot leave the intersection. This does not work however on bi-directional tracks as Block Signals don't take into account whether or not a train can leave a block, leading to a potential gridlock when two trains face head on.
There is no general best distance between signals, but they should be at least as far apart as the longest train that uses this track is.
Building a complete railway
As an example, we'll automate the transportation of ![]() Crude Oil products:
Crude Oil products: ![]() Plastic,
Plastic, ![]() Rubber,
Rubber, ![]() Petroleum Coke and
Petroleum Coke and ![]() Fuel or
Fuel or ![]() Packaged Fuel. Packaging the fluid doubles the capacity one Freight Car can transport, at the cost of having to deal with recycling Empty Canisters or dedicating a part of the Plastic production, it is better to use double the number of Freight Cars in that scenario. It is best to avoid transporting fluids as much as possible (that's why we're transporting Crude Oil products and not Crude Oil itself; for power generation, burn all produced Fuel near the source without having to transport it, for Jetpack and Vehicle fuel only small amounts of either fluid or Packaged Fuel are necessary). For this tutorial, fluid Fuel will be transported.
Packaged Fuel. Packaging the fluid doubles the capacity one Freight Car can transport, at the cost of having to deal with recycling Empty Canisters or dedicating a part of the Plastic production, it is better to use double the number of Freight Cars in that scenario. It is best to avoid transporting fluids as much as possible (that's why we're transporting Crude Oil products and not Crude Oil itself; for power generation, burn all produced Fuel near the source without having to transport it, for Jetpack and Vehicle fuel only small amounts of either fluid or Packaged Fuel are necessary). For this tutorial, fluid Fuel will be transported.
Starting with the train, it will have five carriages (one for Plastic, Rubber, and Coke each and two for fluid Fuel, avoiding mixing cargo whatsoever). As mentioned above, the recommended ratio is one Locomotive per four Freight cars, and because five Freight Cars are used, the train will be hauled with two Electric Locomotives. It is very useful to define the order of the carriages, so we don't accidentally happen to mix cargo later on.
The station at the Crude Oil outpost will consist of a Train Station, one Empty Platform, and five Freight Platforms, of which the last two are for fluids. All of the Freight Platforms have to be set to "load" in their UI (each one individually). The Train Station can be renamed upon being interacted with.
The station at our destination will look the same, with the only exception that the Freight Platforms will be set to "unload".
Automation
Trains can be automated using a timetable. Despite the name, the timetable has nothing to do with time, only sets which stations the train should path to and stop at, it is not possible to e.g. make the train wait until it is fully loaded or unloaded. Setting up the timetable is quite primitive:
- Make one entry for each Train Station, in order, only mentioning each station once
- The train will complete the route in order and automatically go from the last station to the first one
- Bi-directional train routes are set up the same way, however, ensure the train can actually reach all of the stations (as mentioned above, Train Stations are directional and trains can only arrive in them in that direction but can depart either forward or in reverse)
- If the train cannot find a path, check if all Train Stations are rotated correctly, and the Railway is connected (easiest way to check if the Railway is connected is to drive the route manually if the train suddenly stops then the Railway is not connected)
Calculating throughput
Train throughput
The theoretical throughput for a single train can be calculated, using:
- The time (in seconds) for a complete round trip
- The cargo volume for each Freight Car:
- For items: items per stack times inventory size (currently 32)
- For fluids:
- The total belt or pipe input (in items/s or m³/s) at each platform
- The number of Freight Cars:


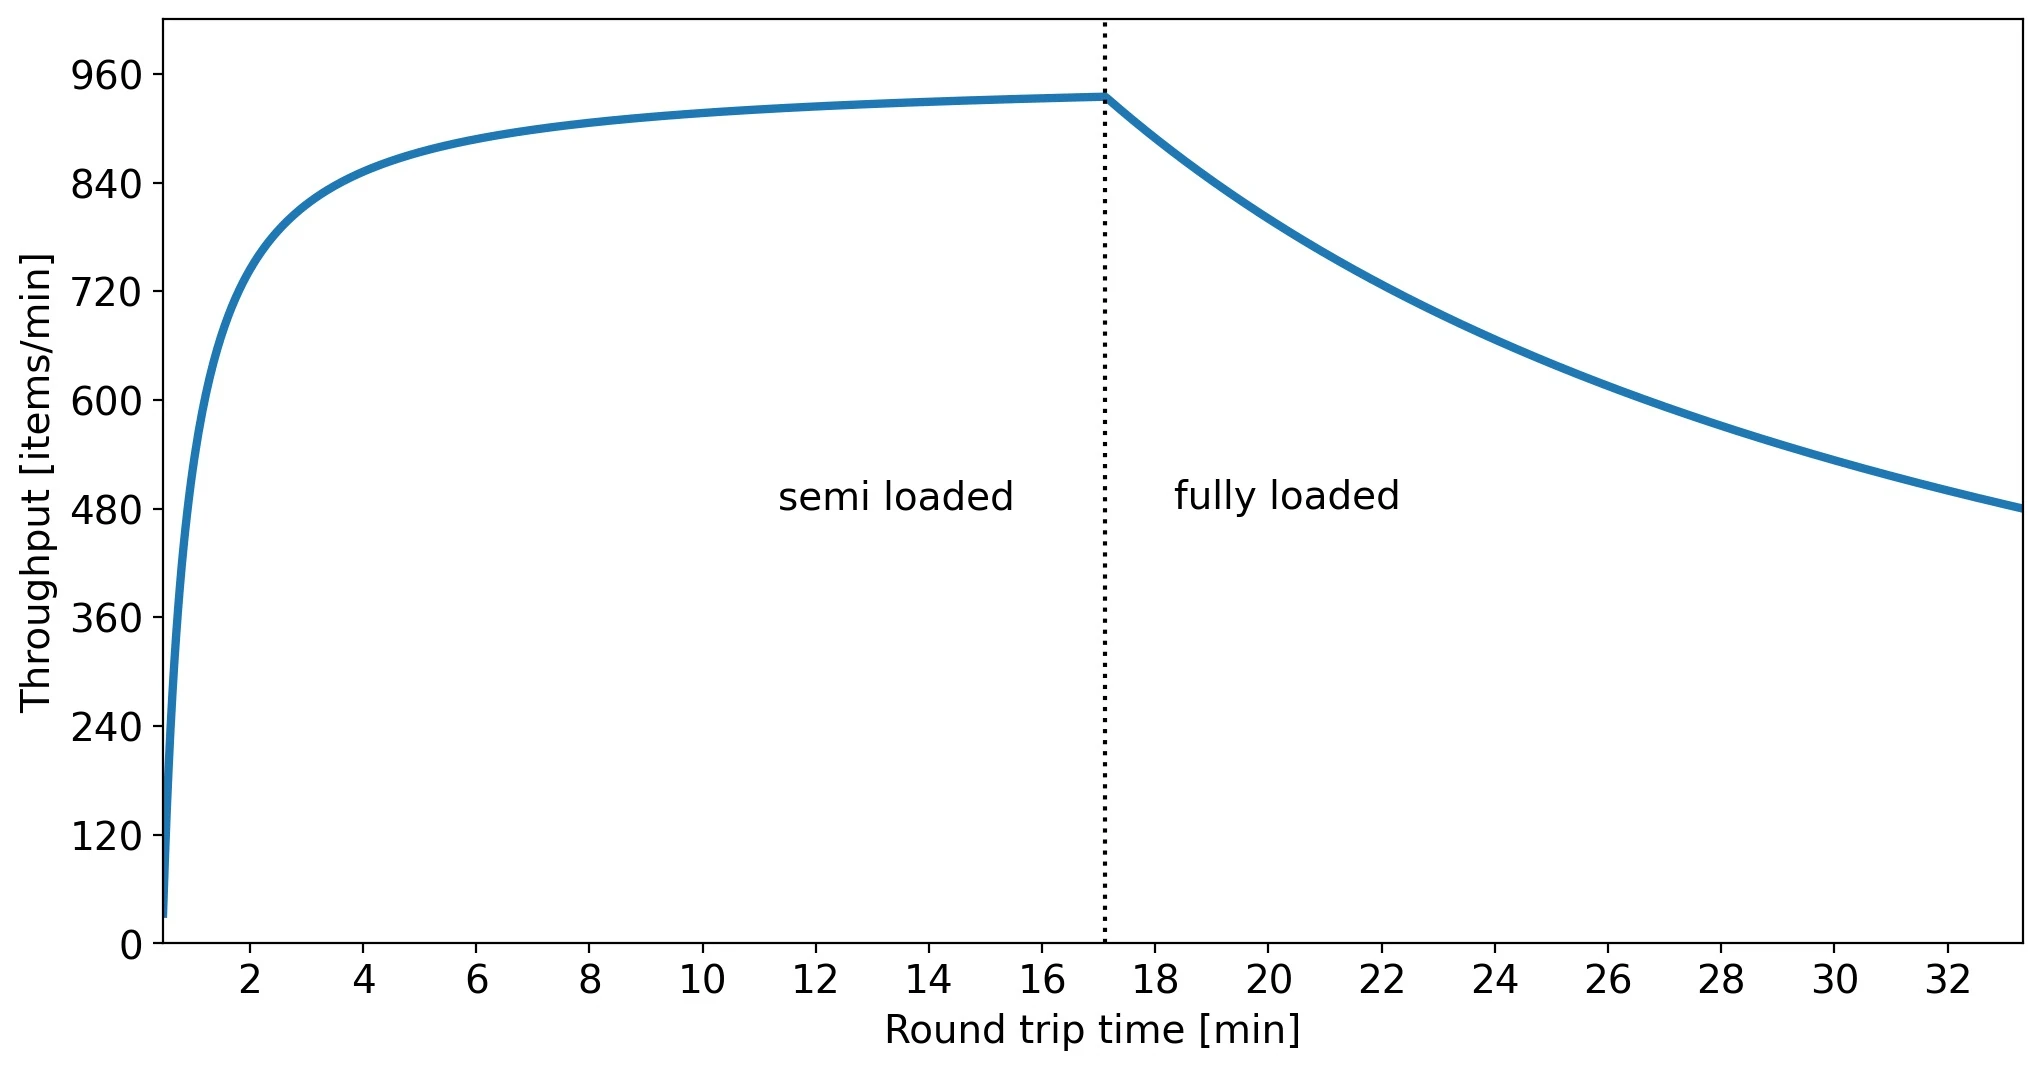
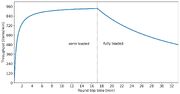
Throughput as a function of trip time. The longer the trip time, the more time the station has to fill up and the higher the throughput. At one point the station is sufficiently full and the throughput decreases again.
First, the required time to sufficiently fill each ![]() Freight Platform has to be calculated:
Freight Platform has to be calculated:

Where 27.08s is the time for the loading animation during which all inputs are blocked. If this time is less than the round trip time, the platform can prepare a full load of cargo and the Freight Cars leave fully loaded. In this case the average throughput is:


Should the time to fill the station be higher than the round trip duration, the Freight Car leaves only semi loaded and the throughput is:

Example
A single Freight Car carrying ![]() Quickwire (500 items per stack) takes 300s (5min) for a round trip, loading from a platform with two
Quickwire (500 items per stack) takes 300s (5min) for a round trip, loading from a platform with two ![]() Conveyor Belt Mk.4 (480 items/min = 8 items/s each). In this scenario the calculations are as follows:
Conveyor Belt Mk.4 (480 items/min = 8 items/s each). In this scenario the calculations are as follows:

The platform takes too long to load and the trains leaves only partially loaded. The throughput is therefore:

Or about 870 items/min (≈1.8 Mk.4 Belts).
Calculating train size
On the other hand, given a desired throughput , the required amount of Freight Cars can be calculated as:


and then rounding up to the next whole number.
Example
Using the numbers from the previous example and a desired throughput of 26 items/s (= 2 Mk.5 Belts), the required amount of Freight Cars is:

Freight Platform fill duration
The following table shows how long (in hh:mm:ss) it takes to completely fill up or empty the storage of a single Freight Platform. (Click [Expand] to view)
| Belts | |||||
|---|---|---|---|---|---|
| Belt Mk. | Stack size 1 | Stack size 50 | Stack size 100 | Stack size 200 | Stack size 500 |
| 1× Mk.1 | 0:00:48 | 0:40:00 | 1:20:00 | 2:40:00 | 6:40:00 |
| 2× Mk.1 | 0:00:24 | 0:20:00 | 0:40:00 | 1:20:00 | 3:20:00 |
| 1× Mk.2 | 0:00:24 | 0:20:00 | 0:40:00 | 1:20:00 | 3:20:00 |
| 2× Mk.2 | 0:00:12 | 0:10:00 | 0:20:00 | 0:40:00 | 1:40:00 |
| 1× Mk.3 | 0:00:10 | 0:08:53 | 0:17:46 | 0:35:33 | 1:28:53 |
| 2× Mk.3 | 0:00:05 | 0:04:26 | 0:08:53 | 0:17:46 | 0:44:26 |
| 1× Mk.4 | 0:00:06 | 0:05:00 | 0:10:00 | 0:20:00 | 0:50:00 |
| 2× Mk.4 | 0:00:03 | 0:02:30 | 0:05:00 | 0:10:00 | 0:25:00 |
| 1× Mk.5 | 0:00:03 | 0:03:04 | 0:06:09 | 0:12:18 | 0:30:46 |
| 2× Mk.5 | 0:00:01 | 0:01:32 | 0:03:04 | 0:06:09 | 0:15:23 |
| Pipes | |||||
| Pipe Mk. | Fluid | ||||
| 1× Mk.1 | 0:08:00 | ||||
| 2× Mk.1 | 0:04:00 | ||||
| 1× Mk.2 | 0:04:00 | ||||
| 2× Mk.2 | 0:02:00 | ||||
This table is useful for determining whether the round trip time isn't too long. The round trip time shouldn't be more than 3/5 of the shortest time required for the whole train.
Packed Buffer Strategy
The packed buffer strategy is meant to solve the following scenario:
Factory A produces some good that needs to be shipped to Factory B via Train. Factory A has a large storage reserve of this good, and all output of this good is put into storage, then drawn from storage into consuming machines. This is a common strategy to allow for overproduction of a good that meets demand while also allowing the pioneer an available supply for other uses. In our example, Factory A is better equipped to produce ![]() Encased Industrial Beam, which is needed by Factory B, some large distance away. We need to transport the
Encased Industrial Beam, which is needed by Factory B, some large distance away. We need to transport the ![]() Encased Industrial Beam via Train, but we also need to use our large storage reserve for output of the
Encased Industrial Beam via Train, but we also need to use our large storage reserve for output of the ![]() Encased Industrial Beam. The consumers of
Encased Industrial Beam. The consumers of ![]() Encased Industrial Beam at Factory B only consume it at a rate of 5 parts/min, but the lowest we can ship it out of storage is 60 parts/min (unless we do a complicated series of divide back-merges into storage). If we allow our Freight Platform at Factory A to receive the
Encased Industrial Beam at Factory B only consume it at a rate of 5 parts/min, but the lowest we can ship it out of storage is 60 parts/min (unless we do a complicated series of divide back-merges into storage). If we allow our Freight Platform at Factory A to receive the ![]() Encased Industrial Beam at a rate of 60 parts/min (the minimum rate we can transport product out of a full storage container), it will fill up. So will the Freight Car that transports it, as well as the Freight Platform at Factory B. If we only have three Industrial Storage Container as a reserve, we will end up dumping almost our entire reserve into the Freight Platforms/Freight Car, without having any available at the producing factory for other uses.
Encased Industrial Beam at a rate of 60 parts/min (the minimum rate we can transport product out of a full storage container), it will fill up. So will the Freight Car that transports it, as well as the Freight Platform at Factory B. If we only have three Industrial Storage Container as a reserve, we will end up dumping almost our entire reserve into the Freight Platforms/Freight Car, without having any available at the producing factory for other uses.
To remedy a full drain of our ![]() Encased Industrial Beam reserves, we will need to use the packed buffer strategy. This involves filling all transport buffers with some other product that can be easily produced in abundance, and doesn't hold significant value (
Encased Industrial Beam reserves, we will need to use the packed buffer strategy. This involves filling all transport buffers with some other product that can be easily produced in abundance, and doesn't hold significant value (![]() Petroleum Coke, or
Petroleum Coke, or ![]() Concrete for example). Once we use the above tutorial (Tutorial:Train Throughput) to calculate how much
Concrete for example). Once we use the above tutorial (Tutorial:Train Throughput) to calculate how much ![]() Encased Industrial Beam we need to actually use (let's say we only need two stacks total to handle consumption at Factory B), we can pack our Freight Platforms and Freight Car with the buffer product to ensure the remaining storage slots will not fill up with our Industrial Beams.
Encased Industrial Beam we need to actually use (let's say we only need two stacks total to handle consumption at Factory B), we can pack our Freight Platforms and Freight Car with the buffer product to ensure the remaining storage slots will not fill up with our Industrial Beams.
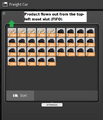
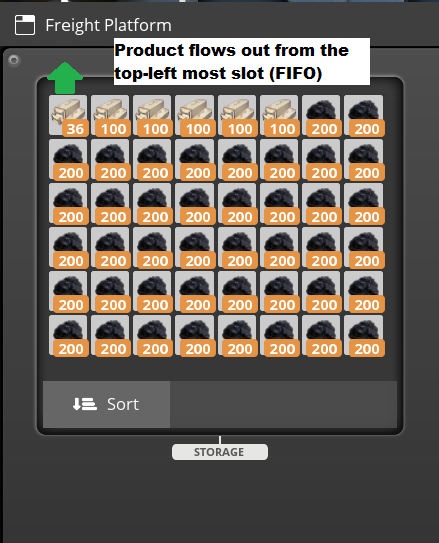
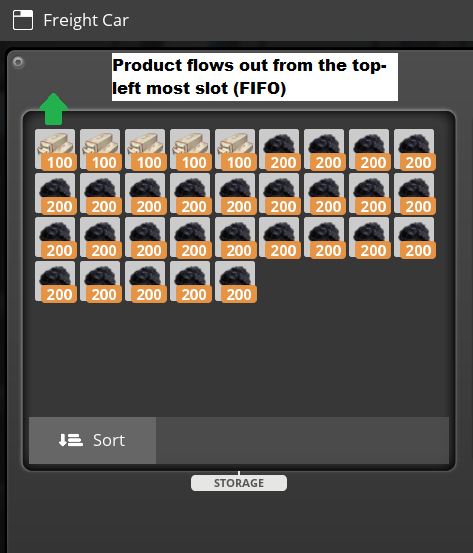
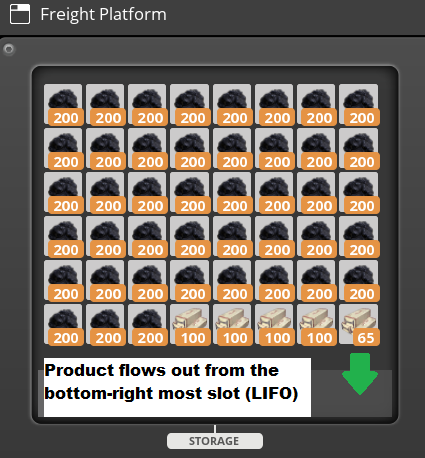
The only tricky part of this is understanding how items will enter/leave a Freight Platform/Freight Car. The below pictures demonstrate how products flow through train storage:

Direction in which product leaves from input Freight Platform at Factory A.
Direction in which product leaves a Freight Car.

Direction in which product leaves from output Freight Platform at Factory B.
Products are shipped in a FIFO manner (First In, First Out). Products are extracted from output storage in a LIFO manner (Last In, First Out). If you arrange your Freight storage containers/cars with a packed buffer in this order, you will be able to transport only the minimal amount of the desired product (![]() Encased Industrial Beam in this case), while never transporting the buffer product (
Encased Industrial Beam in this case), while never transporting the buffer product (![]() Petroleum Coke in this case), while also keeping all of your storage reserves of
Petroleum Coke in this case), while also keeping all of your storage reserves of ![]() Encased Industrial Beam in place back at Factory A where it is produced and reserved.
Encased Industrial Beam in place back at Factory A where it is produced and reserved.
| |||||||||||||||||||||||||||||